LaTeX standalone Class
LaTeX standalone class
LaTeX standalone class is 1:
A class and package is provided which allows TeX pictures or other TeX code to be compiled standalone or as part of a main document. Special support for pictures with beamer overlays is also provided.
The package is used in the main document and skips extra preambles in sub-files. The class may be used to simplify the preamble in sub-files. By default the preview package is used to display the typeset code without margins.
The behaviour in standalone mode may adjusted using a configuration file standalone.cfg to redefine the standalone environment.
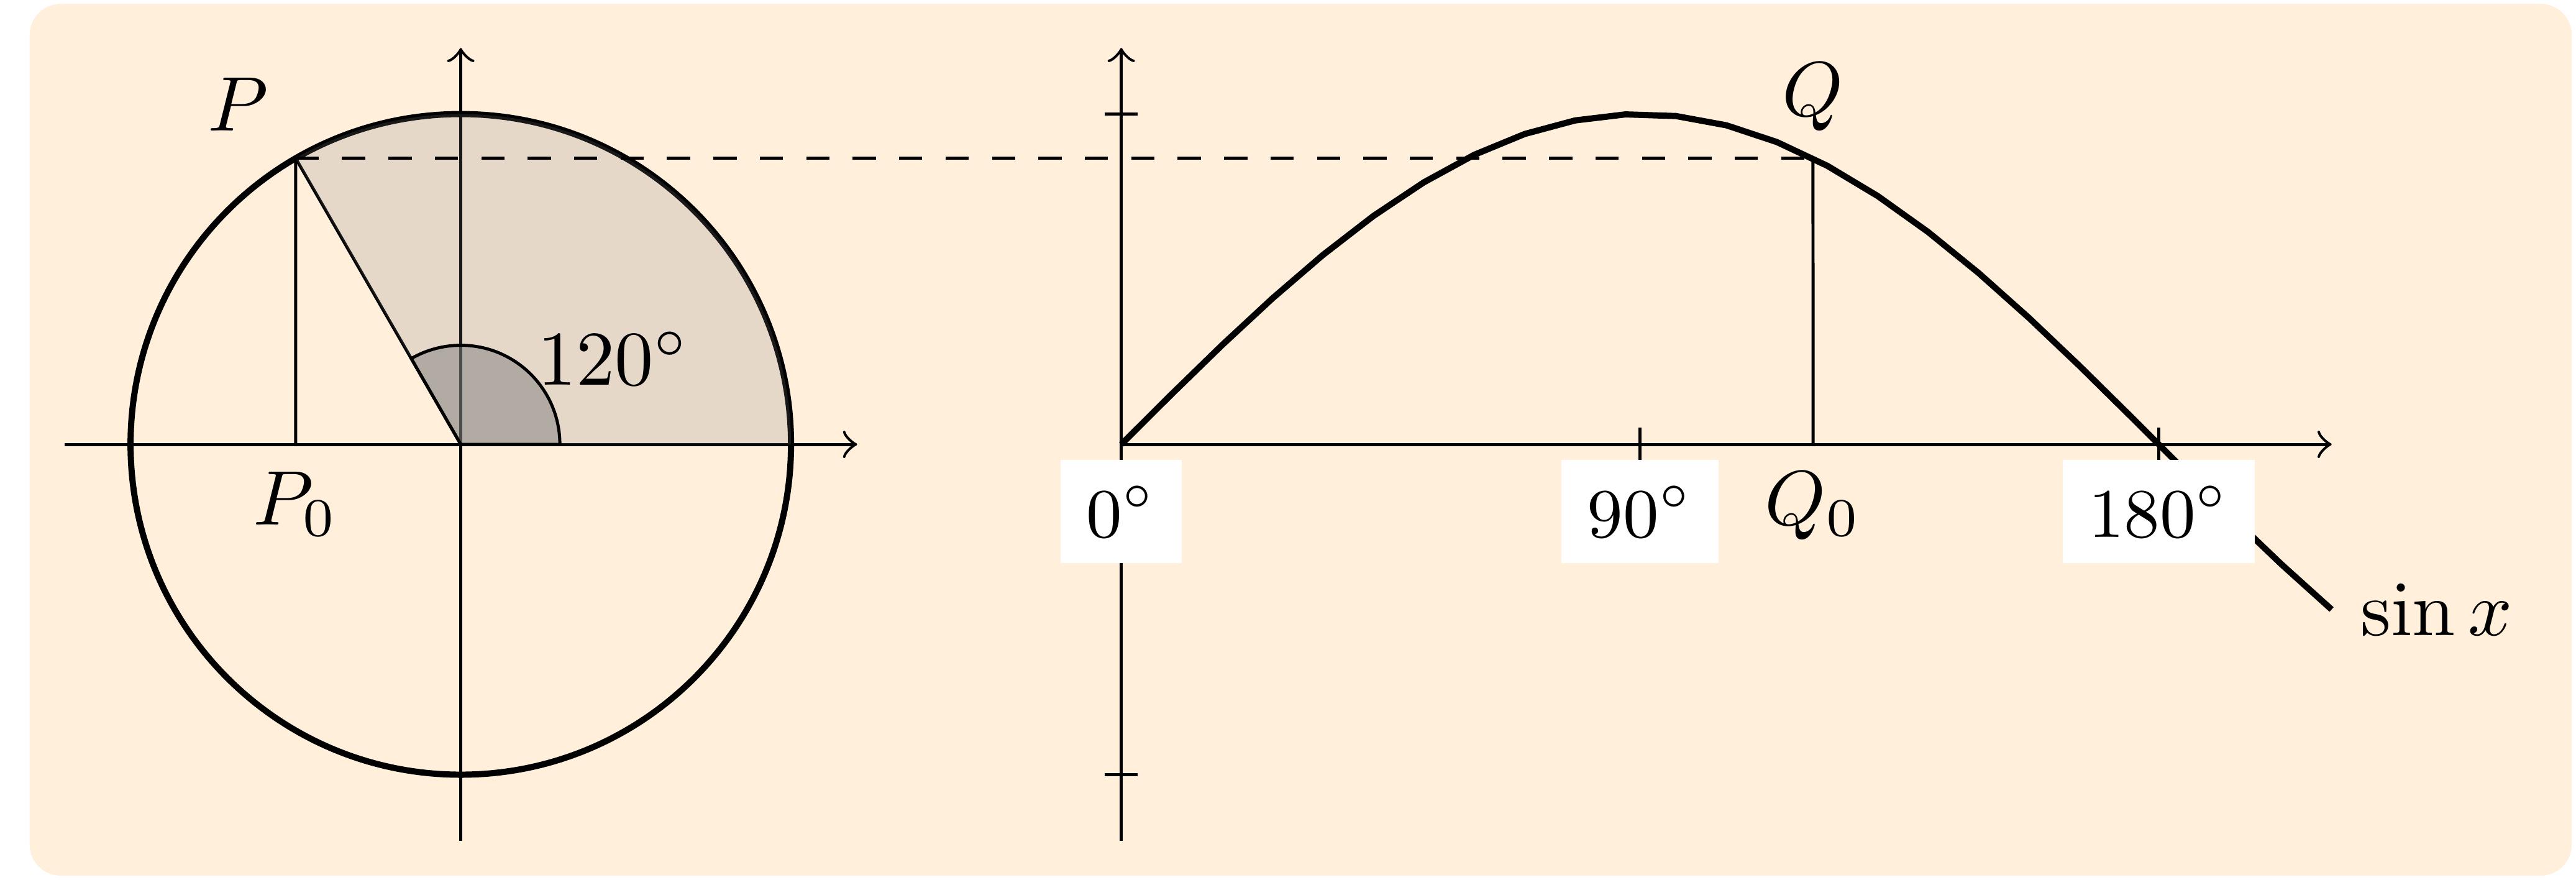
By standalone class, we can get a more concise result, like the following case for example, page size can be adjusted automatically according to the TikZ figure size (plus page border width, and border width can be negative):
The TikZ code for test is obtained from reference2.
1
2
3
4
5
6
7
8
9
10
11
12
13
14
15
16
17
18
19
20
21
22
23
24
25
26
27
28
29
30
31
32
33
34
35
36
37
38
39
40
41
42
43
44
45
46
47
48
49
\documentclass{standalone}
\standaloneconfig{preview, border=0.50001bp}
% border={<length (left)> <length (bottom)> <length (right)> <length (top)>}

\usepackage[x11names]{xcolor}
\usepackage{tikz,siunitx}

\usetikzlibrary{backgrounds}

\begin{document}
	\tikzset{
	background rectangle/.style={rounded corners,fill=AntiqueWhite1}
	}
	\begin{tikzpicture}[framed,scale=1.5]
	\newcommand\iangle{120}

		\begin{scope}[xshift=-2cm]
			\draw[->] (-1.2,0) -- (1.2,0);
			\draw[->] (0,-1.2) -- (0,1.2);
			\draw[thick] (0,0) circle (1);
			\coordinate[label=\iangle:$P$] (P) at (\iangle:1);
			\coordinate[label=below:$P_0$] (P0) at (P |- 0,0);
			\draw (0,0) -- (P);
			\draw (P) -- (P0);
			\fill[fill=gray,fill opacity=0.2]
			(0,0) -- (0:1) arc (0:\iangle:1) -- cycle;
			\filldraw[fill=gray,fill opacity=0.5]
			(0,0) -- (0:0.3) arc (0:\iangle:0.3) -- cycle;
			\node[right] at (\iangle/2:0.3) {\ang{\iangle}};
		\end{scope}

		\draw[->] (0,0) -- ({rad(210)}, 0);
		\draw[->] (0,-1.2) -- (0,1.2);
		\draw[thick, domain=0:rad(210)] plot (\x, {sin(\x r)})
		node[right] {$\sin x$};
		\foreach \t in {0, 90, 180} {
		\draw ({rad(\t)}, -0.05) -- ({rad(\t)}, 0.05);
		\node[below, outer sep=2pt, fill=white, font=\small] at ({rad(\t)}, 0) {\ang{\t}};
		}

		\foreach \y in {-1,1} {\draw (-0.05,\y) -- (0.05,\y);}

		\coordinate[label=above:$Q$] (Q) at ({rad(\iangle)}, {sin(\iangle)});
		\coordinate[label=below:$Q_0$] (Q0) at (Q |- 0,0);
		\draw (Q) -- (Q0);

		\draw[dashed] (P) -- (Q);
	\end{tikzpicture}
\end{document}
By the way, if we import xcolor package with x11names option after importing tikz package, i.e.
1
2
3
4
5
6
% ...

\usepackage{tikz,siunitx}
\usepackage[x11names]{xcolor}

% ...
an package-clash error will occur: Option clash for package xcolor.
There are several options available for standalone class, and I’ll record some practical ones in the following text.
varwidth option to make newline available
In standalone document, it’s not a default case to treat the empty line (and other similar commands) as a symbol of creating a new paragraph as in other normal categories of document, e.g.
1
2
3
4
5
6
7
8
9
10
11
12
13
14
\documentclass{standalone}
\standaloneconfig{preview,border=10pt}

\usepackage{lipsum}

\begin{document}

\lipsum[1][1]

\lipsum[1][2]\\ \newline

\lipsum[1][3]

\end{document}

varwidth option3 can solve this problem1:
varwidth=true|false
varwidth=<width>
A trailing empty line between the content and \end{document} will normally create a paragraph which is \linewidth wide. This paragraph (or any other one) will enlarge the size of smaller pictures and display itself as a large right border. This option uses the varwidth package to wrap the content into a varwidth environment, which is based on minipage, but will always use the natural width of the content if it is smaller than the given maximum width. The resulting effect is that the created paragraph will not cause any additional width and that multiple paragraphs can be included as part of the content. The used maximal width (which is provided to the underlying minipage environment) is \linewidth by default, but can be set by provided a width as value to the option. Doing so will also switch the option on.
1
2
3
4
5
6
7
8
9
10
11
12
13
14
\documentclass[varwidth]{standalone}
\standaloneconfig{preview,border=10pt}

\usepackage{lipsum}

\begin{document}

\lipsum[1][1]

\lipsum[1][2]\\ \newline

\lipsum[1][3]

\end{document}
Insert standalone-class document content into another .tex file
There are two methods to insert content in standalone-class document into another .tex file, by \includegraphics and \includestandalone command, respectively:
Above .tex script is named as doc.tex.
1
2
3
4
5
6
7
8
9
10
11
12
13
14
15
16
17
18
19
20
21
22
23
24
25
26
27
28
29
30
31
32
33
34
35
36
37
\documentclass{article}
\usepackage[margin=1in]{geometry}

\usepackage[subpreambles=true]{standalone}
\usepackage{graphicx}
\usepackage{lipsum}

\usepackage[x11names]{xcolor}
\pagecolor{Azure2}

\begin{document}
\thispagestyle{empty}

\lipsum[1]

% Method 1:
% use `\includegraphics` command after compiling `doc.tex`
\begin{figure}[h]
	\centering
	\includegraphics{doc.pdf}
	\caption{Sine function and unit circle (implemented by \textsf{TikZ})}
\end{figure}

\lipsum[2]

% Method 2:
% use `\includestandalone` command, choose `tex`, `image`, or `image|tex` mode
% `image` mode is also only availale when `doc.pdf` exists after compiling `doc.tex`
\begin{figure}[h]
	\centering
	\includestandalone[mode=tex]{doc} % NB: with no file extension
	\caption{Sine function and unit circle (implemented by \textsf{TikZ})}
\end{figure}

\lipsum[3]

\end{document}

where \includestandalone command1:
This sophisticated macro can be used instead of \input to include standalone files. Its behaviour is controlled by the mode package option. This macro can either include the source code in the same way as \input (mode=tex), include the output file (PDF, EPS) using \includegraphics (mode=image), try first the output file and use the source file if it is available (mode=image|tex), build the output file from the source file either always (mode=build), only if the image files does not exist (mode=buildmissing) or only if the source file is newer (mode=buildnew, which doesn’t work on XeLaTeX because some pdfTEX macros are required for this).
The <file> argument must be the file name of the standalone source file without the extension. The macro accepts the same options as \includegraphics as well as any options suitable for \standaloneconfig. This means that the source file can also be resized and rotated in tex mode like an image. TODO: In this mode the package also tries to extract and apply the class options from the standalone file and apply these to the included source. Unfortunately, it can not be fully guaranteed that the standalone content will be displayed identical in source code and image mode. Some settings might not be applied in the same way and rounding differences may occur.
It should be noted that when we specify tex mode when using \includestandalone, we need:
(1) import standalone package and make subpreambles option true, i.e.
1
\usepackage[subpreambles=true]{standalone}
(2) comment the 2nd line, i.e. \standaloneconfig{preview, border=0.50001bp}, in the dox.tex, otherwise an error occurs:
1
Package xkeyval Error: `preview' undefined in families `standalone.sty'. \standaloneconfig {preview, border=0.50001bp}
And I didn’t find the reason.
References
-
CTAN: Package
standalone, documentation: The standalone Package. ˄ ˄2 ˄3