Create LaTeX Bordered Matrix by \bordermatrix Macro and nicematrix Package
\bordermatrix macro
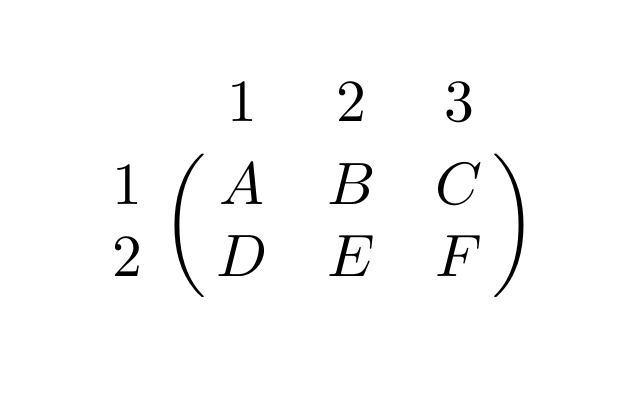
Plain TeX provide a macro \bordermatrix123 to create a matrix with left-column and top-row annotation, like:
1
2
3
4
5
6
7
8
9
10
11
12
\documentclass{article}

\begin{document}

$
\bordermatrix{
  & 1 & 2 & 3 \cr
1 & A & B & C \cr
2 & D & E & F \cr}
$

\end{document}
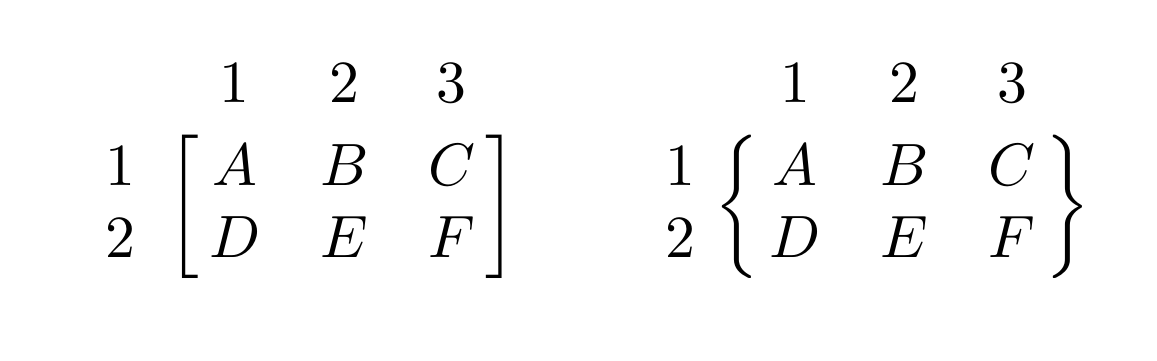
Herbert Voß provide a way (seem redefine \bordermatrix macro) to support specifying bracket style of bordered matrix4:
1
2
3
4
5
6
7
8
9
10
11
12
13
14
15
16
17
18
19
20
21
22
23
24
25
26
27
28
29
30
31
32
33
34
35
36
37
38
39
40
41
42
43
44
45
46
47
\documentclass{article}

\makeatletter
\newif\if@borderstar
\def\bordermatrix{\@ifnextchar*{%
	\@borderstartrue\@bordermatrix@i}{\@borderstarfalse\@bordermatrix@i*}%
}
\def\@bordermatrix@i*{\@ifnextchar[{\@bordermatrix@ii}{\@bordermatrix@ii[()]}}
\def\@bordermatrix@ii[#1]#2{%
\begingroup
  \m@th\@tempdima8.75\p@\setbox\z@\vbox{%
    \def\cr{\crcr\noalign{\kern 2\p@\global\let\cr\endline }}%
      \ialign {$##$\hfil\kern 2\p@\kern\@tempdima & \thinspace %
      \hfil $##$\hfil && \quad\hfil $##$\hfil\crcr\omit\strut %
      \hfil\crcr\noalign{\kern -\baselineskip}#2\crcr\omit %
      \strut\cr}}%
  \setbox\tw@\vbox{\unvcopy\z@\global\setbox\@ne\lastbox}%
  \setbox\tw@\hbox{\unhbox\@ne\unskip\global\setbox\@ne\lastbox}%
  \setbox\tw@\hbox{%
    $\kern\wd\@ne\kern -\@tempdima\left\@firstoftwo#1%
      \if@borderstar\kern2pt\else\kern -\wd\@ne\fi%
    \global\setbox\@ne\vbox{\box\@ne\if@borderstar\else\kern 2\p@\fi}%
    \vcenter{\if@borderstar\else\kern -\ht\@ne\fi%
      \unvbox\z@\kern-\if@borderstar2\fi\baselineskip}%
      \if@borderstar\kern-2\@tempdima\kern2\p@\else\,\fi\right\@secondoftwo#1 $%
  }\null \;\vbox{\kern\ht\@ne\box\tw@}%
\endgroup
}
\makeatother

\begin{document}

$
\bordermatrix[{[]}]{
  & 1 & 2 & 3 \cr
1 & A & B & C \cr
2 & D & E & F \cr}
$
\qquad
$
\bordermatrix[{\{\}}]{
  & 1 & 2 & 3 \cr
1 & A & B & C \cr
2 & D & E & F \cr}
$

\end{document}
BTW, in above examples, command \cr is used to conclude a table row. It is more fundamental than \\ as introduced in reference5:
A short note on the \cr command
LaTeX addresses the issue of an unexpected alignment character by substituting it with a fundamental command known as \cr, which is integral to LaTeX’s internal mechanics for concluding a table row. Although users utilize the LaTeX \\ macro to indicate the end of a table row, it is actually the \cr command that is executed behind the scenes to terminate the row when the \\ macro is processed.
nicematrix package
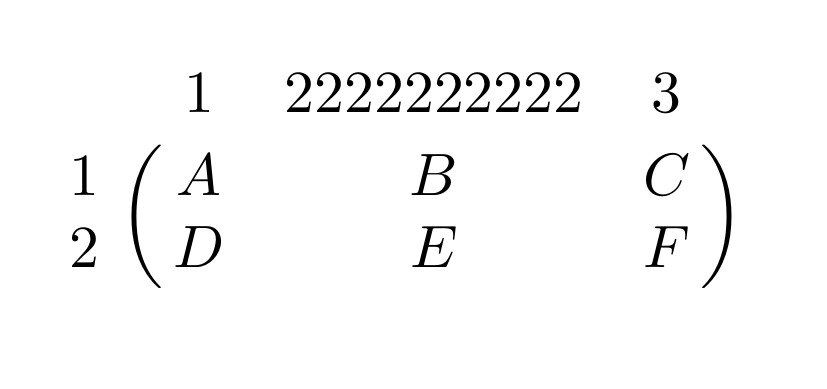
Macro \bordermatrix has some cons: one is that users can’t annotate on the right or the bottom of matrix, and another one is too long text make the gap between matrix elements adjust automatically, at times not our intention, and we can’t create an annotation spanning multiple columns or rows, by \multicolumn or \multirow, to solve this problem.
For example:
1
2
3
4
5
6
7
8
9
10
11
12
\documentclass{article}

\begin{document}

$
\bordermatrix{
  & 1 & 2222222222 & 3 \cr
1 & A & B & C \cr
2 & D & E & F \cr}
$

\end{document}
If we use \multicolumn in \bordermatrix:
1
2
3
4
5
6
7
8
9
10
11
12
\documentclass{article}

\begin{document}

$
\bordermatrix{
  & 1 \multicolumn2c{2222222222} \cr
1 & A & B & C \cr
2 & D & E & F \cr}
$

\end{document}
an error will occur:
1
Misplaced \omit. 2 & D & E & F \cr}
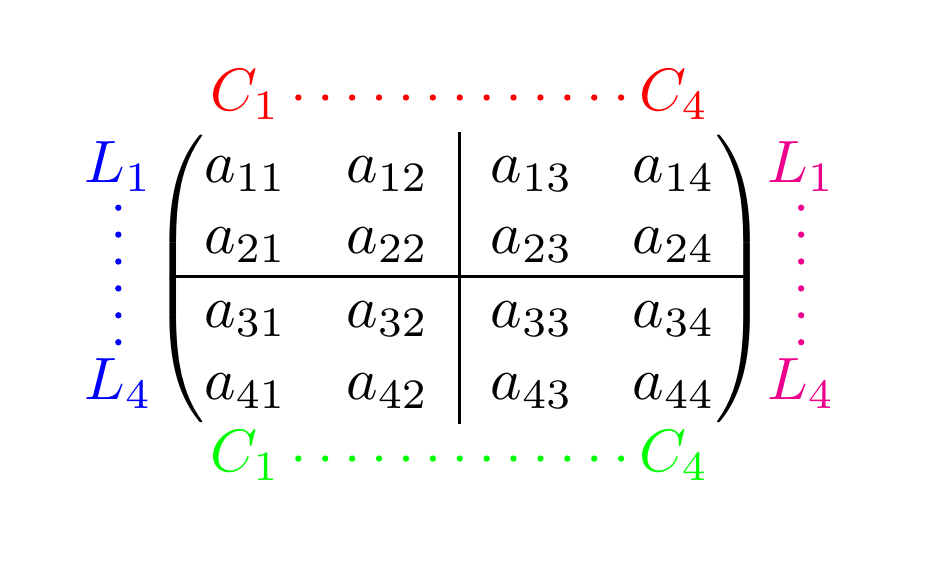
LaTeX package, nicematrix67, provides more powerful functions to deal with above situations. Here are two examples to illustrate.
1
2
3
4
5
6
7
8
9
10
11
12
13
14
15
16
17
18
19
20
21
\documentclass{article}
\usepackage{nicematrix}

\begin{document}
\NiceMatrixOptions{
code-for-first-row = \color{red},
code-for-first-col = \color{blue},
code-for-last-row = \color{green},
code-for-last-col = \color{magenta}}
\begin{displaymath}
\begin{pNiceArray}{cc|cc}[first-row,last-row=5,first-col,last-col,nullify-dots]
       & C_1    & \multicolumn1c{\Cdots} & & C_4  & \\
L_1    & a_{11} & a_{12} & a_{13} & a_{14} & L_1 \\
\Vdots & a_{21} & a_{22} & a_{23} & a_{24} & \Vdots \\
\hline
       & a_{31} & a_{32} & a_{33} & a_{34} & \\
L_4    & a_{41} & a_{42} & a_{43} & a_{44} & L_4 \\
       & C_1    & \multicolumn1c{\Cdots} & & C_4 &
\end{pNiceArray}
\end{displaymath}
\end{document}
1
2
3
4
5
6
7
8
9
10
11
12
13
14
15
16
17
18
19
20
21
22
\documentclass{article}
\usepackage{nicematrix}

\begin{document}
\NiceMatrixOptions{
code-for-first-row = \color{red},
code-for-first-col = \color{blue} \rotate,
code-for-last-row = \color{green},
code-for-last-col = \color{magenta} \rotate}
\begin{displaymath}
	\begin{pNiceArray}{ccccc}[first-row,last-row=6,first-col,last-col,nullify-dots]
	       & C_1    & \multicolumn3c{\text{This is a line}} & C_2 & \\
	       & a_{11} & a_{12} & a_{13} & a_{14} & a_{15} & \\
	\Block{3-1}{\text{This is a line}} & a_{21} & a_{22} & a_{23} & a_{24} & a_{25} & \Block{3-1}{\text{This is a line}} \\
	       & a_{31} & a_{32} & a_{33} & a_{34} & a_{35} & \\
	       & a_{41} & a_{42} & a_{43} & a_{44} & a_{45} & \\
	       & a_{51} & a_{52} & a_{53} & a_{54} & a_{55} & \\
	       & C_1    & \multicolumn3c{\text{This is a line}}    & C_4 &
	\end{pNiceArray}
\end{displaymath}

\end{document}
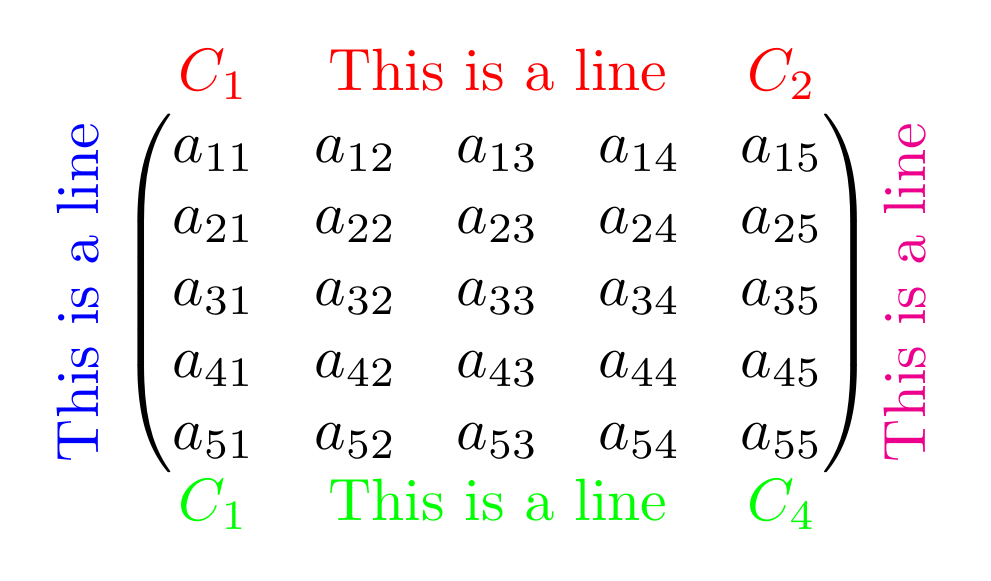
where6:
\Block (pp. 4)
In the environments of nicematrix, it’s possible to use the command \Block in order to place an element in the center of a rectangle of merged cells of the array.
The command \Block must be used in the upper leftmost cell of the cells of the block with two mandatory arguments.
-
The first argument is the size of the block with the syntax
i-jwhereiis the number of rows of the block andjits number of columns.If this argument is empty, its default value is
1-1. If the number of rows is not specified, or equal to*, the block extends until the last row (idem for the columns). -
The second argument is the content of the block. In
{NiceTabular},{NiceTabular*}and{NiceTabularX}, the content of the block is composed in text mode whereas, in the other environments, it is composed in math mode.
\rotate (pp. 47)
The package nicematrix provides a command \rotate. When used in the beginning of a cell, this command composes the contents of the cell after a rotation of 90° in the direct sens.
References
-
The TeXbook, Donald E. Knuth, 1984, pp. 177. ˄
-
Using the
kbordermatrixpackage.pdf, pp. 1. ˄ -
TeX Mathmode, Herbert Voß, 2014, pp. 21-22. ˄
-
Extra alignment tab has been changed to
\cr- Overleaf, Online LaTeX Editor. ˄ -
tables - Border matrix with multiple indices on top and bottom - TeX - LaTeX Stack Exchange. ˄